Paul Dainty, Application Engineer at Leica Geosystems, gives his top tips for the 3D Viewer.
“The 3D Viewer was a key focus area when developing Leica Captivate. We wanted the user to be able to visualise their measurement data by viewing it in 3D in any part of the software. We also wanted data to appear realistically in the 3D Viewer, whilst at the same time make it very easy for the user to operate. A lot of research was done to make the 3D Viewer as easy-to-use as possible,” explains Paul.
1. Did you know the 3D Viewer shows everything?
The 3D Viewer shows all types of data that the user is interested in – all at the same time. The data types might include background images, CAD data, points, lines, alignments, scan data, DTMs and application relevant data such as results, indications or instructions.
2. Did you know the 3D Viewer is available everywhere?
The 3D Viewer is available throughout Leica Captivate – from viewing and editing data to within applications. In fact there are well over 200 instances of the 3D Viewer, all individually designed and customised for each particular place in the software.
3. Did you know that text labels are always readable?
Text labels in the 3D Viewer are intelligently filtered so that they are always easily readable and never overwrite each other. The text occlusion filtering takes place automatically, no matter which view you are looking at.
4. How to activate the full screen 3D Viewer using the keypad
In any measurement panel that shows the 3D Viewer, you can press “Fn” and then cursor left or right on the keypad to toggle viewing the 3D Viewer in full screen or split screen. When in full screen mode, the 3D Viewer can also be controlled by the keypad.

5. How to hide and show objects in the 3D Viewer
If you need to see less or more in the 3D Viewer, you can access the Object Display panel by tapping the lowest tool in the Set toolbar. Here individual object types (points, lines, scans, alignments etc.) and text can be configured to be visible or not.

6. How to select multiple objects in the 3D Viewer
Imagine you need to quickly delete a large number of objects. The easiest way to do this is to use the 3D Viewer – tap on the points or lines to be deleted, then tap and hold and choose Delete object(s) from the context menu.
To more quickly select a large number of objects, use the Window selection tool on the Set toolbar. Remember, if you draw the window from left to right, only the lines fully contained in the window will be selected. If you draw the window from right to left, the lines which cross the window will also be selected.

7. How to hide, view and select CAD layers in the 3D Viewer
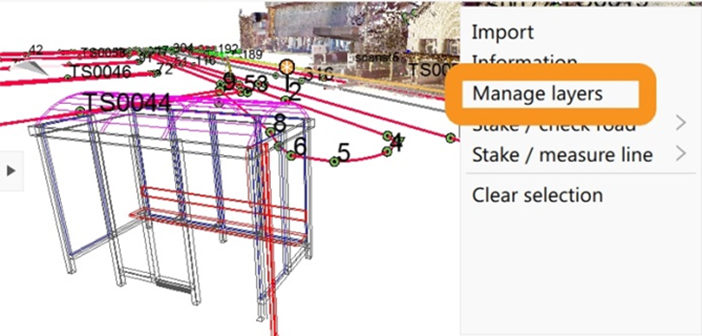
When using attached CAD files within the 3D Viewer, individual layers can be set to be hidden, visible (and not selectable), or selectable. The easiest way to do this is in the 3D Viewer – just tap and hold on any CAD element and then choose Manage layers from the context menu. Within the CAD Layer Management panel, the focus will be placed on the layer of the CAD element which was selected.

8. How to select data in the camera view of the 3D Viewer
Overlaid data such as points, lines and CAD data can be selected even in the camera view, by using the toolbar button to toggle between tap and turn mode, and selection mode. The tool is only shown when in a camera view, and is the lowest one on the Set toolbar.

9. How to centre objects in the 3D Viewer for easy navigation
Use the centre-to-object tool on the zoom toolbar, to bring any selected object to the centre of the 3D Viewer. Centring a point, for example, allows easy and quick zooming to or rotating around that point.

10. How to use the centre-to-target tool so the 3D Viewer follows you around as you measure
When in a measurement panel of either a TS or GS device, use the Centre-to-target tool on the toolbar to lock the centre of the 3D Viewer to the measured position. The 3D Viewer will appear to follow you around as you measure, allowing you to easily check your measured data whilst on the move.

For more information on the 3D Viewer, check out this link
Discover the benefits of Leica Captivate
Hope you enjoyed this week’s Leica Captivate Blog post!
Paul Dainty


