


Welcome back to our blog! In this first blog of the three-part series, I will get more specific and probably a bit more serious. I work for Leica Geosystems, part of Hexagon and, as a global trainer for detection products, I am in a very privileged position to have access to a range of equipment which includes electromagnetic cable locators, handheld high-frequency GPR, utility detection GPR, multi-array GPR systems, GPS and TPS, collection software and post-processing software, in fact, the whole range of products when looking for a complete solution from detecting/locating to reporting.
Alongside access to technology, Hexagon also offers training to help you utilise our products to their highest potential. By the way, did you know that Leica Geosystems can tailor a training course to suit your needs? The trainer will come to your location and do the theory, practical use, tips and tricks, processing, export of data, and even sort the CAD out for you. We can do that live on a job if it’s easier, just call the trainer for a day or ask for an assisted survey. Sorry about that, but I got to sell myself and that kind of stuff from time to time, I am a 25 years plus utility and Ground Penetrating Radar (GPR) surveyor after all.
First things first, are all you operators out there aware that all GPR systems, including handheld units, may and will come under licencing control depending on what your locale is? Let’s check the European and US regulations.
For example, in the UK, we need to have an Ofcom licence to operate and abide by its rules:
- European regulations and implementation map
- UK regulations
- US regulations
This series of blog posts will explore in detail the different GPR systems. Today, I will be focusing on Leica DSX – A New Hope.
Yep, Star Wars this time! Leica DSX does things in a different but effective way. If you’re an experienced user, then you might not like the idea of that. All you GPR nerdies, including me, embrace the technology, it hasn’t been designed and built to make us guys obsolete. It’s been designed to make GPR more accessible to users who don’t need or maybe don’t possess (yet) the expert skills that we might have. Leica DSX uses GPR technology in a traditional way, it comes as a push along cart system, looks like that GPR should look like, ‘it’s got a tablet PC on it, you can use a GPS or TPS to position with. So what does it do differently? Well, it has a unique software design called DXplore that enables the user to pick targets and assign definitions to them and show them live inside a 3D cube on the screen. That’s progress, guys and girls.
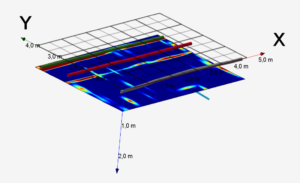
Data from the DSX collected and analysed in roughly 15 minutes in total.
The DSX uses a 600Mhz frequency antenna, and the software tailors the incoming data to give a 2.0m operating window, based on ground conditions. Remember we ‘can’t change the laws of physics, we have to work with them, ‘it’s a GPR so follows the standard rules. The software tests the dielectric value when commencing a scan and applies it to that data set. The system works in grid mode to produce 3D cubes. The antenna has horizontal polarisation, so we have to ‘’see’’ our targets at 90 degrees to our scan direction and combined with 50cm scan separation, the algorithms do the rest. GPS connectivity is just how we usually do it, pop a sim card in the tablet, and forget about the need to have a cell phone hotspot for corrections. The GG04+ antenna gives excellent results via Zeno connect, and the flagship GS18T antenna provides tilt-compensated measurements for all those wobbly moments.
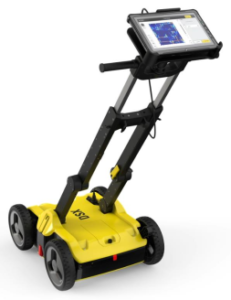
The Leica DSX – looks like a GPR and does what a GPR should. The software, though, is a bit different.
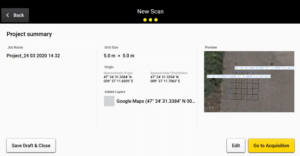
Intuitive screen selection options quickly get you going. You can easily set the grid parameters on the screen; the origin button sets the coordinate system if being used. The layers button lets us use background mapping or load a DXF for reference. Then simply position yourself on screen with the tool.
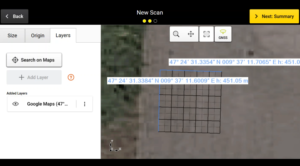
You can always edit, save, draft your settings for later use, or go to acquisition.

The acquisition screen will then show you the grid line positional reference on the left, the progress is monitored on the actual grid with the live GPR position, and a green line indicates a completed scan line. Obstructions can be navigated around using the arrows. The add POI button allows you to add a surface feature live in the scan. For example, if you locate a cable (yes, we would always use a cable locator before GPR), simply add the EML button at the point along its route. If used with a GPS or TPS, the path of DSX is visualised on screen in near real-time, allowing for accurate alignment and corrections of the acquisition path based on visual representation. Pretty, cool, no?
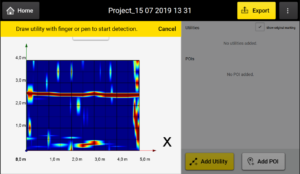
As soon as you collect the data, the magic starts. With the touch of your finger, you can mark the utilities. You select targets, only by using the add utility button and drawing on the tablet screen along the high contrast line where you think a utility is located. The software does the analysis and will give utility or anomaly decision.
A brief snapshot of the new kid on the block, remember that this is not a training, there is more to get all the tips and useful instructions. If you are interested in learning more about the DSX, enrol in our Detection Campus, and you’ll receive full training on the Leica Geosystems utility detection portfolio.
Stay tuned with the next detection blog post as I will be talking about Leica DS2000, the utility detection radar with a dual-frequency antenna.
To learn more download the White Paper GPR Systems & Their Use here.

Steve Davies
Global Trainer – Detection Products, Leica Geosystems part of Hexagon