Paul Dainty, application engineer at Leica Geosystems, explains the various views available in Stake apps within Leica Captivate, and some of the features and options available within the views.
This video explains even more about stake views and staking in general.
1. Stake views within Stake apps
Within Stake apps in Leica Captivate, there are several views to help make the process of staking out as easy as possible. For example, whether in the Stake points, Stake line or Stake road app, the layout of the stake views is very similar, providing a familiar interface regardless of the task. All these apps share the same selection of views, which will be highlighted next.

2. 2D and 3D views
All stake apps can benefit from the 3D viewer, allowing staking to be performed in a 2D or even a 3D view. Information relating to the stake position is given at the same time as allowing the user to navigate freely in the 3D viewer. This is a great view for visualising the current scene, and selecting objects to stake.

3. Stake view
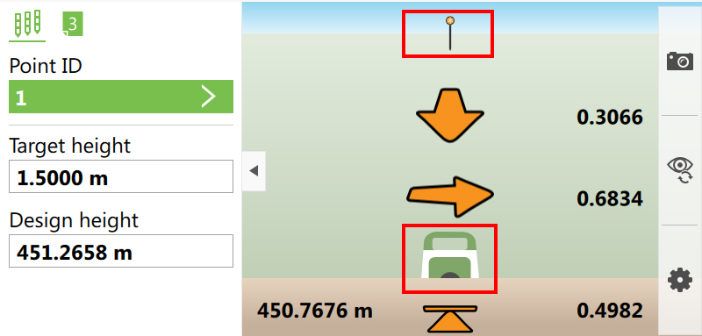
The stake view can be thought of as the traditional view, where the staking scene is simplified and represented by instructional arrows and values. This is probably still the most used stake view on-site, as the large clear graphics, and user-selectable referencing options mean that staking is made simple and easy, which is especially useful in harsh site conditions.
4. Navi view
The navigational view, or navi view is new in Captivate. Utilising the 3D viewer’s powerful graphics, the concept is similar to a car navigation system, where the view is based on the user’s current position and direction of movement. In the navi view, the 3D viewer appears to follow behind the user as they move, and the guidance arrow points in the direction to go. The view works best when there is background data, such as a previous survey or background CAD data.

5. Stake view option – navigational arrow types
In the stake view, the user can choose many options of how they want to be guided to their stake position. One of the options in the Settings is the Navigational arrow types, which can be set as either “In/out, left/right” or “Direction and distance”. The option “In/out, left/right” gives instructions in a grid format, where the user must move to the side or forwards/backwards. The option “Direction and distance” gives instructions to the user about how much to turn and how far to go in that direction. Which to use depends on the users’ preference and situation.

6. Stake view option – help me navigate from behind instrument
In the stake view, the user can choose the object they want to orientate to for the staking process. In the Settings, the Help me navigate option can be set to “From behind instrument” for example. The graphics in the stake view clearly show this, and the instructions are given as if the user is stood behind the instrument looking at the measuring pole.

7. Stake view option – help me navigate facing object
In the stake view, the user can choose the object they want to orientate to for the staking process. In the Settings, the Help me navigate option can be set to “Facing <object>” for example, where the <object> can be the “instrument”, “North” a specific “point” or in GNSS mode, “the Sun”. The graphics in the stake view clearly show the orientation object, and the instructions are given as if the user is stood at the measuring pole, looking at the <object>.

8. Stake view option – help me navigate using line
In the stake view, the user can choose the object they want to orientate to for the staking process. In the Settings, the Help me navigate option can be set to “Using line” for example, where the line can be a baseline, the line being staked or an alignment, depending on the app. The graphics in the stake view clearly show the relative position of the line, and the instructions are given as if the user is stood at the measuring pole, looking along the line.

9. Stake view – flip view
In the stake view, it is possible to temporarily reverse the stake orientation, in the case that the user is no longer facing the chosen orientation object, but has the object behind them. Pressing Fn F4 will flip the view, and reverse all the instructions, as if the user had aligned themself in the opposite direction. This can be useful to avoid the need to walk backwards if the stake point is behind the user.

10. Stake view – bullseye view
The bullseye view option provides a better scale of view when the user is within 0.5m of the stake position. The view is centred on the stake position, and the measured position roams around the view. The user can quickly and precisely stake out, still based on their chosen orientation.

Discover the benefits of Leica Captivate
I hope these tips have helped you to understand more about stake views.
Best,


