


Welcome back to the second blog of our series about GPR technology. Last time, I talked about the revolutionising Leica DSX utility detection solution. Today we will be talking about Leica DS2000, the dual-frequency antenna.
The Leica DS2000 is a dual-frequency system and operates with two frequencies, 700Mhz, and 250Mhz. It’s been around for a while, and for all us old-timers, it’s familiar, like a cozy old armchair. It’s reliable, predictable, and does exactly what it says on the tin. Like the Leica DSX, it has a folding handle to keep it compact for transporting around and uses the same style tablet. But, and there’s always a but, you need to know what you are doing with this one. That sounds ominous, and I’m not trying to scare you off, it collects GPR data and displays data back to you the traditional way in a B-scan view, so it’s better to know how to get the best out of it and understand what the display is telling you.
The current version of the data collection software is Unext version 1.2. It is an excellent piece of software. It allows some control over how to collect the data and how you visualise the data while live in the scan. There’s a target picking feature, hyperbola fitting, reporting, and export function, including a 3D DXF like geomap export. Again, this system can do positioning by GPS and TPS and is simple to set up.

This is good to go at this point, as the system is OK, you will have a system error message here if you have a problem. We are good to go, though.
The New Project collection (acquisition) screen consists of several toolbars, both vertically and horizontally arranged. These can be moved, resized, and can be visible or not depending on your personal preference.
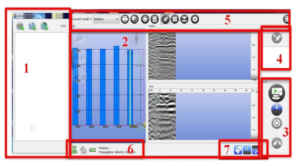
- Section 1 – Working with background satellite imagery or image file is controlled here.
- Section 2 – This work area is called ‘world map’. It displays the individual swaths relevant to the collection period. An image file or satellite background imagery would be displayed if being used, and the scans positioned accordingly when used in conjunction with a positioning system.
- Section 3 – Swath acquisition command tools – start/stop, backward/forward, map graphic settings, and auto spray (if supported) are all controlled here.
- Section 4 – Target picking and command features.
- Section 5 – General acquisition tool menu.
- Section 6 – System status information.
- Section 7 – On-Screen window visualisation selection – select between world view, shallow or deep antenna, all or some, the choice is yours.
I’m not going to do a step by step guide here, just a synopsis of what’s available, we couldn’t give it all away. If you want to collect in grid mode, then The New assisted Project is for you, this though is collected with no external positioning.
The collection window is the same for both collection modes and looks similar to the below:
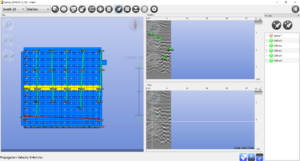
The data is from the Leica Geosystems test site in Stoke-on-Trent, UK, you can see the “world map” on the right, and both radar channels are visible on the left. Target selection has been made through the swaths, their positions plotted, and relevant target lines drawn in the “world map”. All targets picked are listed in the far left panel and are fully editable.
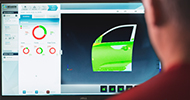
By picking the target selection button, you get control of the on-screen radar channels, and you can select your chosen hyperbola. This then opens the following window:
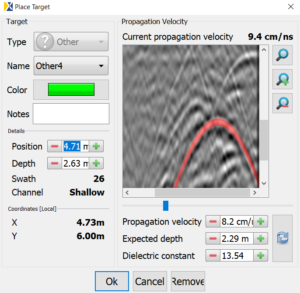
In this window, you can adjust the dielectric constant/propagation velocity and perform a hyperbola fit. To achieve this, fit the red guideline by using the slider, the position and depth features move the guideline up and down or left to right for accurate fitting.
You can also type in values if you know them.
Assign target names and colours here too for utility designation.
I would also like to give you a quick look at some of the features. Once you are collecting data and marking targets, the next step is reporting and exporting. These features are found in the main toolbar and include many exports. Report mode outputs a pdf report, two modes are available and are fully editable.
That’s a wrap for the DS2000; there’s more, of course, but not now. If you are interested in learning more about Leica DS2000, enroll in our Detection Campus, and you’ll have full training on the Leica Geosystems utility detection portfolio. Next time, I will be talking about the IDS C-thrue, the handheld GPR, and IDS STREAM C, the GPR array system.
To learn more download the White Paper GPR Systems & Their Use here.

Steve Davies
Global Trainer – Detection Products, Leica Geosystems part of Hexagon